- Rated ( votes)
- 1,311 views
-
- Stronghold Crusader Overview
- 5 mins


Baldwin is a skirmish opponent in Stronghold Crusader: Definitive Edition (available in the Baldwin and Bullseye DLC).
Baldwin is heralded as a renowned ruler of the Kingdom of Jerusalem, from the glory of the Crusades. Despite contacting leprosy at an early age, his keen sense in politics and military warfare was unrivaled, as he managed to repel the Arabians' tide. On the battlefield, Baldwin makes sure to feel his presence, as he prefers to employ the strengths from all three arsenals at his will, living up to his cunning. If his metal mask has not made an impression on his chosen target, his sheer willpower and position of power can do the job.
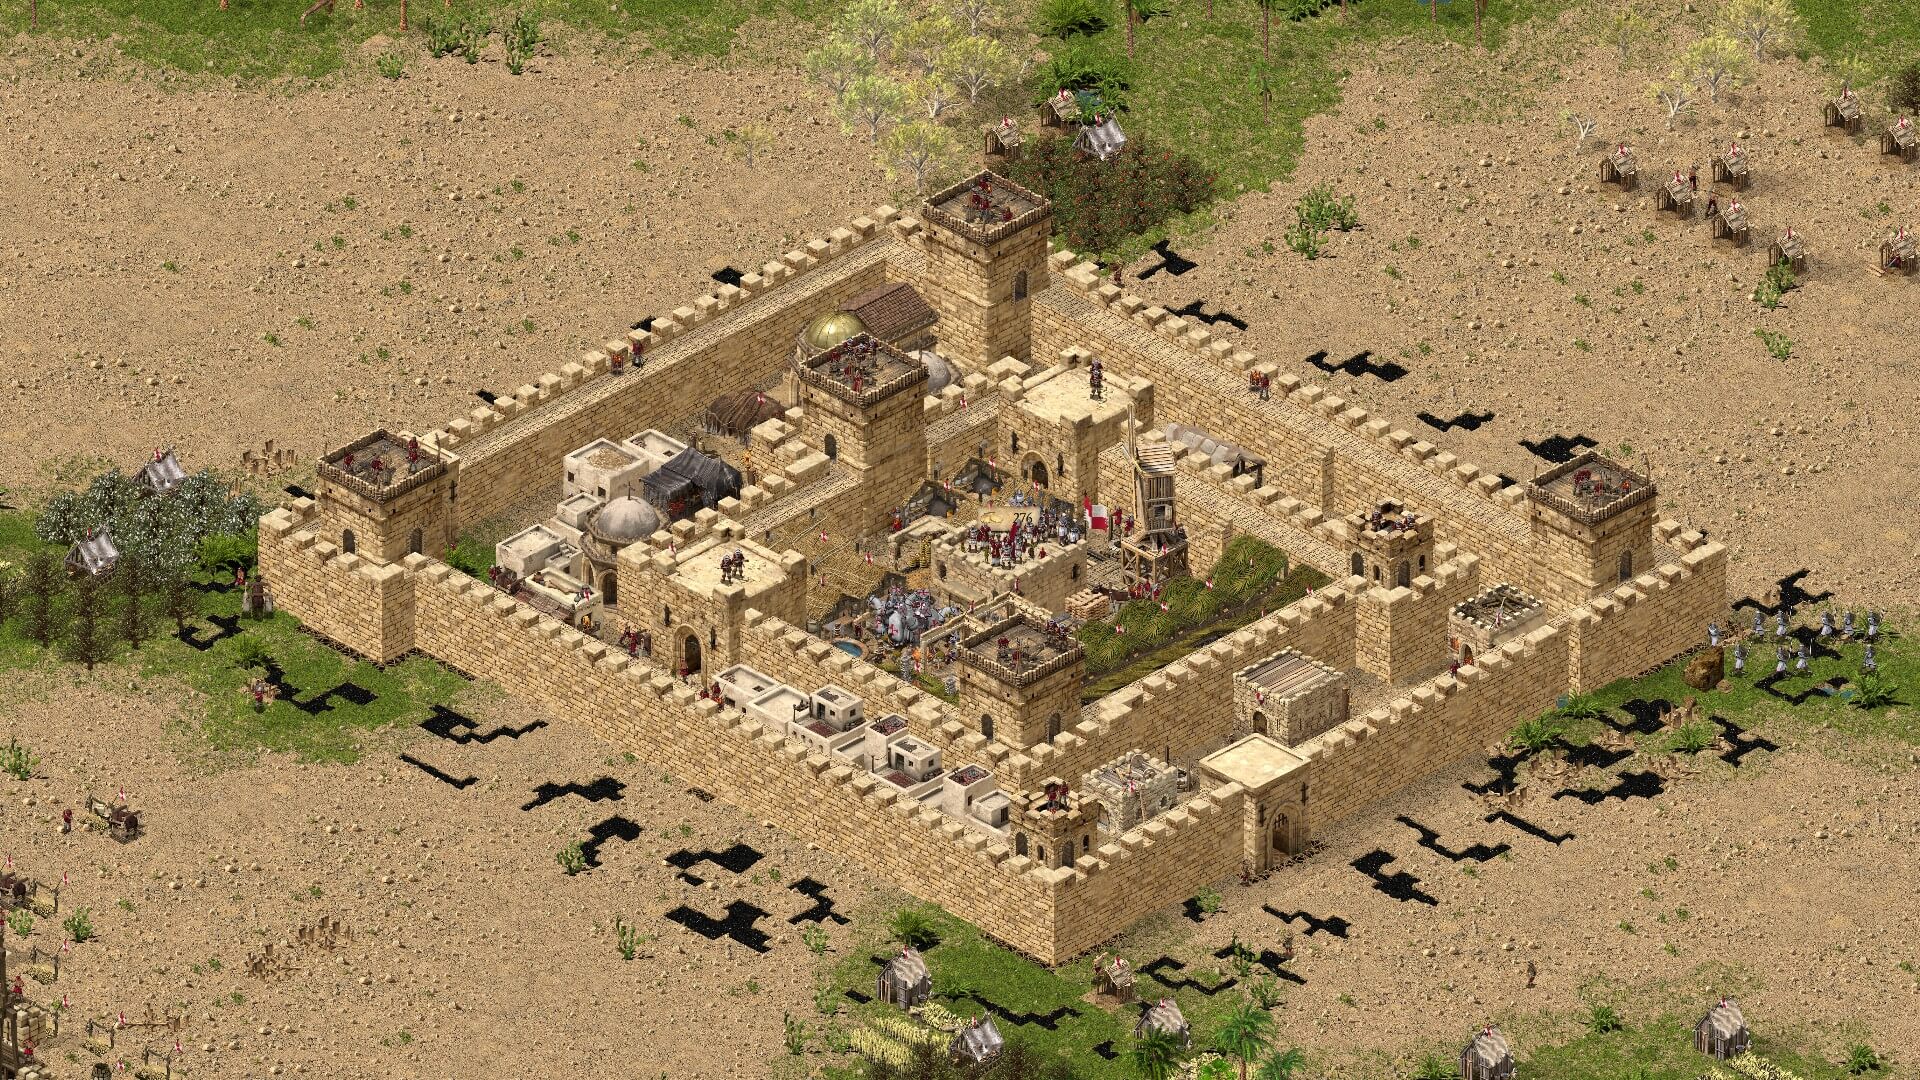
Baldwin tends to borrow a lot of inspiration from Richard the Lionheart's castle designs. His castles are rectangular, featuring two rings of thick walls with crenellations, supported by sporadically placed Square Towers, Perimeter Turrets and gates. The outer ring consists most of the town and military buildings, while the inner sanctum houses a massive weapons industry and a slightly less impressive food production. Along the walls, Crossbowmen and Archers together with Ballistae comprise the first defensive lines, as well as sparsely placed Pitch Ditches drench the ground, ready to be ignited on command. Lines of Killing Pits also riddle the outer towers and gates to fend off infantry picking away at them. The Keep is the place where Baldwin keeps a heavy duty retinue and his large armies forming up for a siege.
Baldwin addresses harassments with Knights and Arabian Bowmen, should he have the funds at the time for it, as well as he patrols his buildings with decently-sized packs of Archers, Crossbowmen and Pikemen.
Baldwin's castles are very densely packed, but offer a lot of blind spots for the clever tactician. Even then, they generally accommodate a good number of ranged defenders, so it is best to attack after Baldwin has sent off a siege force. The defense lacks the firepower against a massive army, so overwhelming numbers of armored and light troops can do the trick against Baldwin. A first line of fast, sacrificial troops should be sent in to trigger the pitch defenses in a zone of choosing, while Catapults and a large group of ranged units, such as Horse Archers may follow them with a steady bombardment and stream of arrows. The outer ring only has Archers, while Crossbowmen reside further within, so the first towers may be cleared easily. The thick volume of walls may prove difficult to overcome, but with persistence a part of the fortifications can be reduced to rubble, opening the way to Baldwin's Keep.
Even though Baldwin's towers have good coverage over the courtyard, the lord himself generally lacks the decisive firepower to nullify a charge of armored troops, such as Macemen or Assassins. Despite, you should aim for clearing as many of the Crossbowmen as possible, since over time they can reduce the rank of attackers significantly. Another way to infiltrate may be rolling in Siege Towers and using Baldwin's towers against his own self, once the outer walls have been breached. The Square Towers can provide enough range advantage to overcome the defenders, while the Keep's loiterers may also be fired at with impunity. Once the rank of armored troops have been weakened around Baldwin, finish off the Lord.
Baldwin builds a very efficient and productive economy, which is geared towards raw mineral extraction to generate funds, and support weapons production. He builds up to six Quarries and Iron Mines, as well as some Pitch Rigs and a lot of weapons workshops to semi-regularly sell surplus equipment on the market. Baldwin also runs a limited food production of Bread and Apples to ignite his war machine, though this method loses efficiency later on as Baldwin fully develops his production. Due to this, he does not really branch out to other aspects of popularity, however he builds a limited number of religion facilities and still employs lower taxes to leverage his large population rates.
Despite his long time to prepare, Baldwin is far from being an idle opponent. He uses troops specialised for certain roles and over time, these formations start coming out once Baldwin's economy is closing completion. Even early on, Baldwin likes to send small groups of Skirmishers in an attempt to cause economic damage, by picking off stray enemy workers and even destroying farms, Quarries or Iron Mines. Over time Knights start getting mixed in the ranks of raiders, adding considerable bulk and damage. There are no raiding siege equipment utilised in-between these attacks.
To live up to his potential, Baldwin pours most of his offensive efforts in sieges. He predominantly attacks with heavy troops: Swordsmen, Pikemen, Heavy Camels and Demolishers, however he also sends a rather colorful bunch of other troops to assist the sluggish formation. First, a decent number of ranged forces are deployed as field defense, usually positioned in the center of the army: Archers, Arabian Bowmen, Crossbowmen and Horse Archers, who also briefly pause to retaliate against enemies while the army is on the march. In order to increase his tactical potential, Baldwin also brings a group of Tunnelers and invisible Assassins, as well as Engineers constructing Battering Rams & Catapults to create breaches in the enemy fortification and infiltrate vulnerable gatehouses.
Baldwin's attacks can range from mildly annoying to semi-threatening while facing him. His raiding forces can prove difficult to parry from close range, so a good-sized mixture of ranged and bulky troops should be rallied to intercept these troops. Fire Ballistae are also particularly effective against any troop and therefore may be worth keeping around alternatively. While preparing for Baldwin's siege, using tower-mounted equipment - preferably Mangonels - and a large number of ranged units in combination is the key. Have these troops occupy sturdy towers if possible, and try utilising Crossbowmen as a main unit: their bolts in large numbers can quickly break Demolisher shields and whittle down the health of Baldwin's armored troops and rams. As a diversion effort, Baldwin will also use his assortment of light troops to create a momentary shooting gallery for your ranged units, as well as his Assassins and Tunnelers will most likely tax your attention elsewhere in the heat of battle. To combat this, try to have Moat dug around your settlement to control the infiltrators' path, or completely eliminate it.