- Rated ( votes)
- 5,771 views
-
- Stronghold Crusader Overview
- 3 mins


The Marshal is a skirmish opponent in Stronghold Crusader & Stronghold Crusader: Definitive Edition.
After the events of Stronghold 1 concluded, Sir Longarm earned a status of a renowned veteran. A few years later, he has decided to try his luck again in desert warfare. Though at times predictable, The Marshal relies heavily on his armored cavalry to make ends meet, as well as English longbowmen to assert his dominance. His castle planning leaves a lot to be desired however, and his low development speed proves more of a hindrance than a benefit to the Marshal.
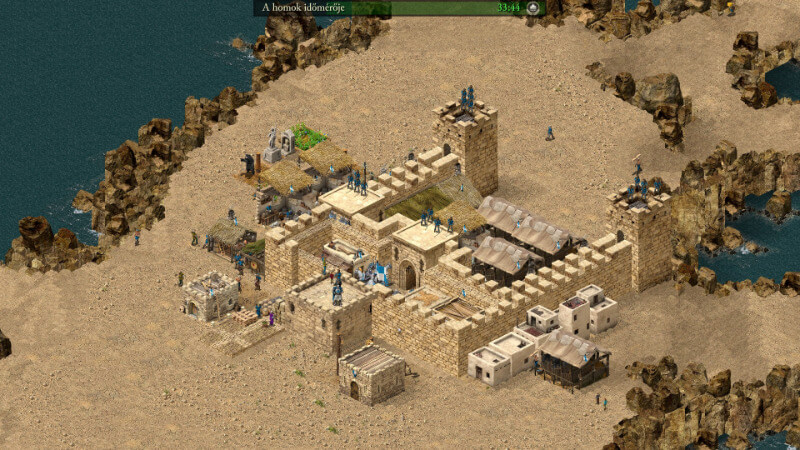
The Marshal has a unique castle design composed of an inner sanctum and a rear courtyard, bordered by thick crenellated walls and Perimeter Turrets. The essential storage buildings are found inside, while the courtyard and the outside of the castle contains industries and numerous Stables. The turrets and the gates have light groups of Archers, as well as the Keep is soundly used as a focal point in the defense. Gates are built connecting the inner area and sometimes the courtyard with the outside world. In certain designs, the Marshal also builds a pocket of Good Things in front of his Keep and surrounds it with Moat.
The Marshal's castle is usually very easy to siege, where his Knights and Swordsmen gathering for attacks are the only potential threat. Climbing the walls with Assassins is always without challenge with the ample exposed wall sections, as well as a large group of ranged units can easily overwhelm the small Archer squads. Even with Fear Factor in play, the Marshal's castle design usually works against him, since the inner area can be sealed just by moving troops near it, trapping the units inside. Eventually, lighting up the castle can also do wonders at thinning out enemy ranks and crippling the Marshal's economy. Reduce the number of armored units before moving in for the kill.
Sir Longarm has a simplistic economy relying mainly on iron. He also gathers stone and pitch in humble quantities, as well as he builds an abundance of Dairy Farms and also grows hops for Ale consumption. Good Things are also built in not too high quantity to provide troop morale and additional popularity. The Marshal also develops his castle and economy in stages, as well as forgoing buying weapons, however he builds a nice number of weapons workshops to craft equipment for his troops.
Knights are the troop that makes the Marshal a potent raider, though they may not arrive until later in the game. Sir Longarm likes to send about a dozen knights in an attempt to go on a destruction spree, targeting outlying farms, quarries and other buildings. Until sent out, these Knights are seen patrolling the Marshal's own buildings, though they are fairly unresponsive to attacks. Lone Catapults may also be added to bombard buildings from afar.
The Marshal is relatively fast at assembling a siege force, which starts off fairly small, but grows steadily over time. Archers and Swordsmen are the Marshal's main unit choice, being less varied, but cheap to build. Siege Engineers are also brought in to construct Trebuchets and hurl rocks over large distances at the enemy castle. Additional Archers may arrive to fill in the enemy moat. This simplistic army tends to fall flat before a moderately prepared defense, however Swordsmen may prove effective at carving a path, should a breach be created. The Marshal's raiding knights could also provide a distraction for the marching army.
Defense against the Marshal is by no means a hard task, though the presence of armor may necessitate heavy firepower, or melee units of your own. The Archers can be felled by simply stationing Archers on top of towers, and the Swordsmen are generally cut short by Assassins, Pikemen or Arabian Swordsmen. Heavy Camels can also be fielded in the open, doubling both as an archer and a heavy shock troop, however care must be given to heal them after a large engagement. It's also recommended to dig Moat in front of your fortifications, as the fragile Archers generally die before they would reach the frontline, leaving the attacking Swordsmen helpless.